The Digital Workshop blog has moved

8 Jun

Thanks for visiting the ship’s website! We haven’t shut down our blog operations, but rather we have moved all of our efforts into one main blog. This is to ensure that the experience for you, the guest, is one that is slightly easier because of more frequent posts, fresher content, and knowing that everything is in one great place.
The URL for the new website is:

http://haldigitalworkshop.wordpress.com/

At this site you’ll find new content, great feedback from all of our Techsperts, as well as useful links like Handout Downloads, and great information from Windows.

Thank you all for your support and for following along with the Digital Workshop.

Selective Color Can Wow Your Friends

21 May

Hello Everyone,
Want a creative way to make a particular part of a picture stand out? Try a method called Selective Color to your pictures. This will allow you to accent an image in color over a black and white picture. You can do this with the Paint function in Windows Live Photo Gallery. Windows Live Photo Gallery is free and can be downloaded to your PC by going to www.download.live.com. All you need to do to create a selective color photo is:
1. Open up a color picture in the Paint function.
2. Open up the same picture in the paint function as a black and white picture
3. Use your free form selection button to trace out the image you want in color
4. Click Copy
5. Paste the copied image on the black and white picture in the paint function
6. Choose Transparent Selection
7. Click and drag the image over the black and white image to accent the color

It’s easy and a fun way to get creative with your pictures.

Wrinkle Free Pictures

7 May

Hello Everyone,

One of the great features of Windows Live Photo Gallery is the retouch button.  This button can remove unwanted elements in your picture.  I for one hate seeing my crows feet when I smile.  I can remove them from my pictures with ease along with other parts of the picture.  The retouch button is in the Adjustments section of the ribbon at the top of Windows Live Photo Gallery after you double click on a picture.

Now that you have double click the image I would zoom into the picture to the element you would like to remove.  Then click to retouch button and create a box around the element and it will remove it.  It’s like magic.

Below you will see the before and after pictures of me at the Yankee game with my giant turkey leg.  I’m still amazed at the size of that leg, it’s as big as my head!

Before:

After:

New Techspert On Board

30 Apr

 Hello Everyone

My name is Anthony and I am the new Techspert on the MS Maasdam.  We are currently sailing to New England before we make our way to Europe.  I host lots of great workshops here in the Digital Workshop.  I’m looking forward to seeing you and I can’t wait to open your eyes to what you can do with your computer and your camera.  After a few of our complementary digital workshops you’ll be on your way editing and sharing your cruise memories with all your friends and family.
See you soon

Anthony

MsMaasdam Techspert in the Digital Workshop, powered by Microsoft

How to Create Artistic Pop Art Effects With Windows Live Photo Gallery

22 Jan

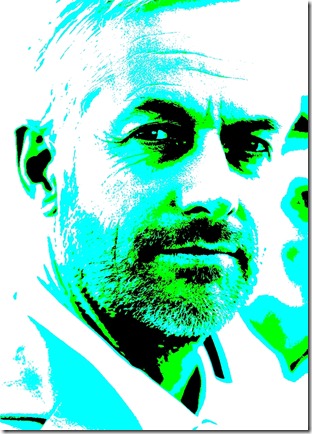
This tutorial will teach you how to use Windows Live Photo Gallery to get amazing “Pop Art” style effects. Here are a couple of what “Pop Art” looks like.

Skin RetouchingPop Art 3Pop Art 5

Now here’s how you do it!!!!

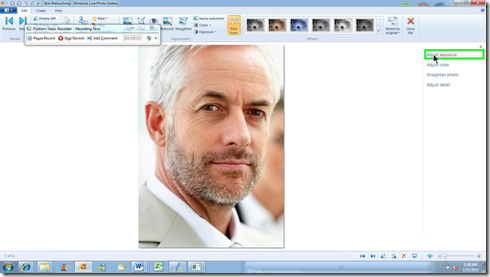
When you open up a photo in Windows Live Photo Gallery click on the “EDIT” tab, and then on the  “FINE TUNE” button, which is found in the center of the top menu bar.

pop1

Next Click on "ADJUST EXPOSURE” which will now be found on the left side of the screen.

pop2


This next step is the MOST important for the “Pop Art” effect. You will see a graph that is labeled “Histogram”. Under this graph there will be a black tab and a white tab. You will need to drag each of them to the center of the graph, as shown below….pop3pop4

Tis is what gives your photo the basis of the “Pop Art” look. You will now notice that there are NO areas of blended colors, only solid chunks of color. This is what makes up that neat painted look.

Next you can experiment with the colors you want to use. Click on the “ADJUST COLOR” tab and play with the settings you like. Here is what I used for the picture seen above.

pop5

Baby New Year and Father Time visit the Maasdam to ring in 2011!!!

4 Jan

The Year Year’s bash aboard the M.S. Maasdam was an amazing farewell to 2010, and a festive welcome to 2011!!!

The M.S. Maasdam’s New Years cruise was a truly tropical way to welcome in the New Year! Sailing the Southern Caribbean with stops in St. Maarten, St. Thomas, and Grand Turk; was an excellent way for the Maasdam’s guests to escape the less favorable climates of the Northern climates!

Perhaps the most comical aspect of the Maasdam New Year’s cruise was a surprise visit from Baby New Year and Father Time!

IMG_1727

Rick (Left) is a cadet onboard and played the Roll of Baby New Year

Daryl (right) is our resident Piano Bar Entertainer and made his debut as Father Time!

It was a truly festive and fresh way to ring in the New Year!

Christmas on the Maasdam

28 Dec

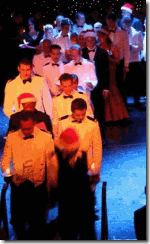
The Christmas spirit on the M.S. Maasdam was truly amplified by the holiday sounds of The International Choir!

The International Choir is made up of 80 crew members from all over the world coming together to project the holiday spirit. The entire choir performed several number together such as “Silent Night” and “Jingle Bells”, but then split up by nationality in to smaller groups which performed Holiday music from their native homelands! There were Holiday carols from Indonesia and the Philippines sang in the style and tradition common to these culture rich nations.

The candlelit finally was breath taking! 80 crew members from all over the globe singing “Silent Night” while each holding candles and walking down off the stage in to the crowd. It was truly a beautiful Christmas experience!

Picture2

Picture6Picture13Picture11